【开源】发布 Jar 包到 Maven Central Repository,上传 javadoc
前言
- 模拟器终于到了阶段一收尾,整理一下如何将开发的项目发布成为大家都能调用的包。
- 本文大部分来源于网上博客[1][2],如有侵权(也许)请联系我。基本都是搬运,欢迎大家支持原作者。
正文
📚 流程目录
- 注册
- 创建项目
- java项目配置
- 上传、验证、发布
- 等待审核
1️⃣ 注册
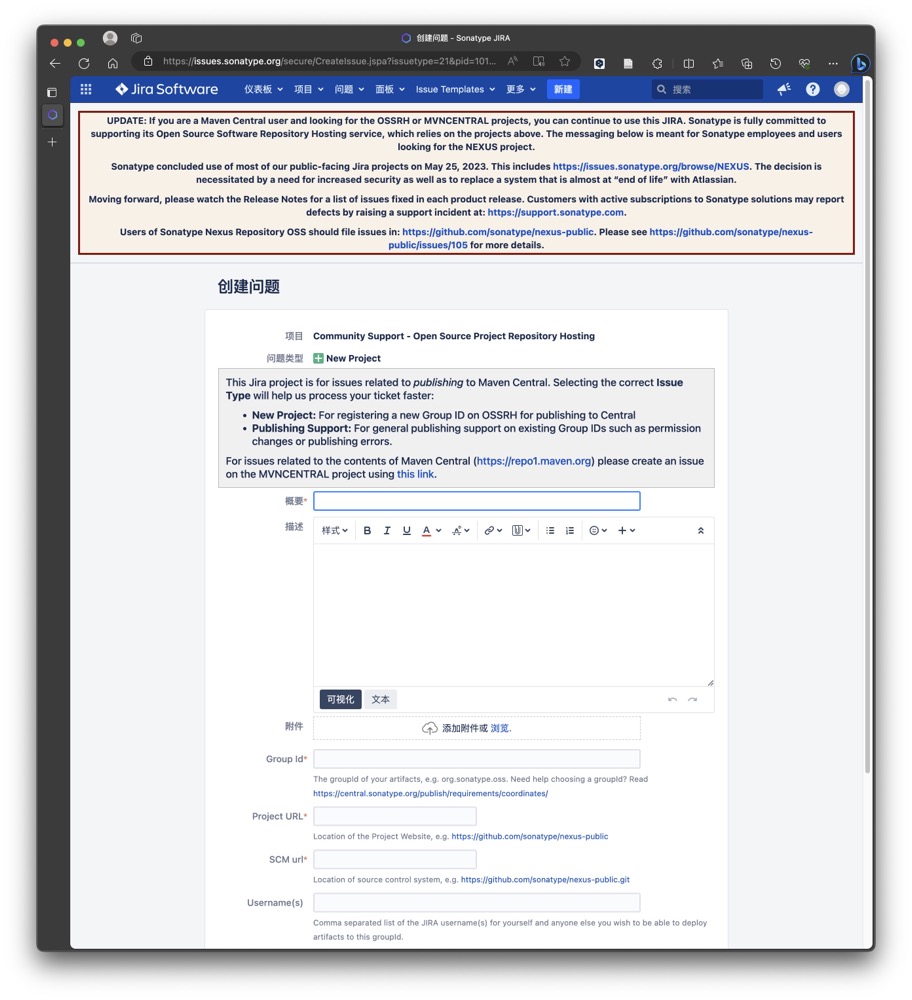
2️⃣ 创建项目
- 根据提示创建 issue(我私自翻译为项目,感觉比较贴切)
 创建 issue
- 在 Sonatype 中 创建 新项目。
- 根据弹出框的提示,填写概要、描述、GroupId、Project URL、SCM url 以及你在 jira 上的用户名。创建完毕后,会被自动跳转到该 issue 的详情页并分配一个唯一的ID,如:OSSRH-33944。余下的时间只需要等待,一般在两个工作日之内,Sonatype 的工作人员就会着手处理,然后他会在该 issue 底下的评论区留言。
- 由于项目仍在开发中,尚处于私有状态,暂未进行这一步,等 javadoc 及一系列修改完成后再进行相关操作。
3️⃣ java项目配置
- 下一步需要在java项目中进行一些必要的配置,包括:验证域名、jar、sourcesJar、javadocJar 以及对这些产物的 signing(签名)。
3.1 密钥生成
3.2 Maven Config 配置
- 放在servers里面
1
2
3
4
5
| <server>
<id>ossrh</id>
<username>你的issues.sonatype.org账号</username>
<password>你的issues.sonatype.org密码</password>
</server>
|
- 放在profiles里面
1
2
3
4
5
6
7
8
9
10
11
12
13
| <profile>
<id>ossrh</id>
<activation>
<activeByDefault>true</activeByDefault>
</activation>
<properties>
<gpg.executable>H:\GnuPG\bin\gpg.exe</gpg.executable>
<gpg.passphrase>刚才你生成密钥时输入的密码,不是指纹!!!</gpg.passphrase>
<gpg.homedir>C:\Users\30398\AppData\Roaming\gnupg</gpg.homedir>
</properties>
</profile>
|
3.3 pom.xml 配置
1
2
3
4
5
6
7
8
9
10
11
12
13
14
15
16
17
18
19
20
21
22
23
24
25
26
27
28
29
30
31
32
33
34
35
36
37
38
39
40
41
42
43
44
45
46
47
48
49
50
51
52
53
54
55
56
57
58
59
60
61
62
63
64
65
66
67
68
69
70
71
72
73
74
75
76
77
78
79
80
81
82
83
84
85
86
87
88
89
90
91
92
93
94
95
96
97
98
99
100
101
102
103
104
105
106
107
108
109
110
111
112
113
114
115
116
117
118
119
120
121
122
123
124
| <?xml version="1.0" encoding="UTF-8"?>
<project xmlns="http://maven.apache.org/POM/4.0.0" xmlns:xsi="http://www.w3.org/2001/XMLSchema-instance"
xsi:schemaLocation="http://maven.apache.org/POM/4.0.0 https://maven.apache.org/xsd/maven-4.0.0.xsd">
<modelVersion>4.0.0</modelVersion>
<parent>
<groupId>org.springframework.boot</groupId>
<artifactId>spring-boot-starter-parent</artifactId>
<version>2.7.0</version>
<relativePath/>
</parent>
<groupId>自己写</groupId>
<artifactId>自己写</artifactId>
<version>1.6.0</version>
<name>KaTool</name>
<description>这里你自己写</description>
<properties>
<maven.compiler.source>8</maven.compiler.source>
<maven.compiler.target>8</maven.compiler.target>
<project.build.sourceEncoding>UTF-8</project.build.sourceEncoding>
<project.reporting.outputEncoding>UTF-8</project.reporting.outputEncoding>
<java.version>1.8</java.version>
</properties>
<dependencies>
......
</dependencies>
<url>例子:https://github.com/Karosown/KaTool</url>
<developers>
<developer>
<id>Karos</id>
<name>Karos</name>
<email>mail@wzl1.top</email>
<roles>
<role>Developer</role>
</roles>
<timezone>+8</timezone>
</developer>
</developers>
<licenses>
<license>
<name>Apache License, Version 2.0</name>
<url>http://www.apache.org/licenses/LICENSE-2.0.txt</url>
<distribution>repo</distribution>
<comments>A business-friendly OSS license</comments>
</license>
</licenses>
<scm>
<connection>例子:https://github.com/Karosown/KaTool.git</connection>
<developerConnection>例子:scm:git:ssh://git@github.com:Karosown/KaTool.git</developerConnection>
<url>例子:https://github.com/Karosown/KaTool/tree/master 分支一定要带上,当时没带上找</url>
</scm>
<build>
<plugins>
<plugin>
<groupId>org.apache.maven.plugins</groupId>
<artifactId>maven-source-plugin</artifactId>
<version>2.2.1</version>
<executions>
<execution>
<id>attach-sources</id>
<goals>
<goal>jar-no-fork</goal>
</goals>
</execution>
</executions>
</plugin>
<plugin>
<groupId>org.apache.maven.plugins</groupId>
<artifactId>maven-javadoc-plugin</artifactId>
<version>2.9.1</version>
<configuration>
<additionalJOptions>
<additionalJOption>-Xdoclint:none</additionalJOption>
</additionalJOptions>
</configuration>
<executions>
<execution>
<id>attach-javadocs</id>
<goals>
<goal>jar</goal>
</goals>
</execution>
</executions>
</plugin>
<plugin>
<groupId>org.apache.maven.plugins</groupId>
<artifactId>maven-gpg-plugin</artifactId>
<version>1.5</version>
<executions>
<execution>
<id>sign-artifacts</id>
<phase>verify</phase>
<goals>
<goal>sign</goal>
</goals>
</execution>
</executions>
</plugin>
</plugins>
</build>
<distributionManagement>
<snapshotRepository>
<id>ossrh</id> <url>https://s01.oss.sonatype.org/content/repositories/snapshots</url>
</snapshotRepository>
<repository>
<id>ossrh</id> <url>https://s01.oss.sonatype.org/service/local/staging/deploy/maven2/</url>
</repository>
</distributionManagement>
</project>
|
3.4 生成相关组件
- 运行 mvn deploy,输入创建密钥时的密码。(以下图片来源于[2])
运行 mvn deploy
输入密码
创建成功
4️⃣ 上传、验证、发布
5️⃣ 等待审核
待完成内容
- 确定项目相关信息,包括:
概要,Group Id及pom.xml中的信息。 - 创建 issue 并填写信息。
- 配置密钥。
- 上传。
🗺参考
[1] 如何发布Jar包到Maven Central Repository
[2] 如何上传自己的项目到Maven中央仓库
[3] M1 Mac 配置 GPG
[4] 如何编译maven工程得到jar、sources、javadoc并上传至Sonatype Nexus OSS